Photography Terminology
Aperture
https://www.youtube.com/watch?v=Npmt7_mlEeg
aperture/f-stop: amount of light let into the lens. A smaller number on the fraction (e.g. f/1.4, f/2) means the lens is mostly open, larger number f-stops (f/5.6, f/8, f/16) means there’s a smaller opening.
- f/4 is a large aperture
- f/16 is a small aperture
A larger aperture means that if you’re capturing something in the foreground, the background may be out of focus. A narrower aperture (larger f-stop, like f/16) can make items more sharper.
smaller impacts:
- imperfections/dust specs are amplified when you have a narrow aperture (larger f-stop, like f/16)
- lower f-stop (e.g. f/1.8) can be less sharp near the edges
- very high f-stop can lead to diffraction
- aberrations:
- vignetting
- como (lights turn into streaks near edges)
If there’s nothing in the foreground, you can often get good sharpness on landscape shots by using a medium aperture, without risking aberrations.
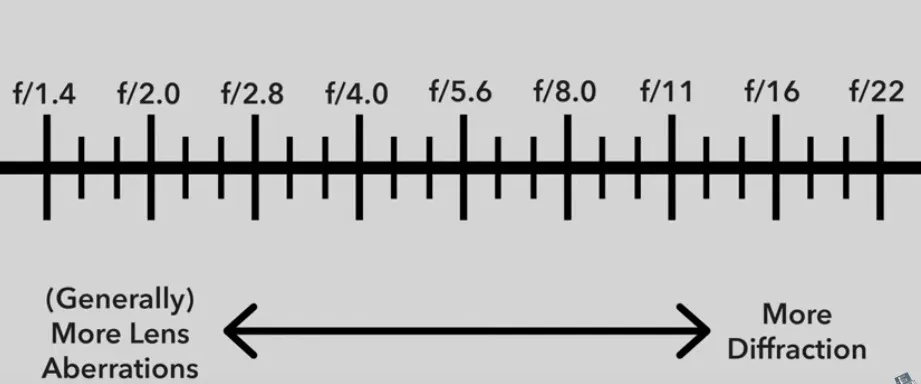
These smaller impacts are not likely to ruin a photo, so if you need a small/large aperture for something, then use that.
Rules (that you can break, if you want):
- Low aperture (f/2.8) for bokeh (blurry out of focus backgrounds)
- For street stuff, f/8 and be there
- For landscape, f/11 is nice and leads to less aberrations
Shutter Speed
https://www.youtube.com/watch?v=FdJhkRFFvUs
Length of time your camera sensor is exposed to the outside world.
Fast shutter speed means a short exposure to light, slow shutter speed means its exposed to light for longer (is brighter)
if there is movement, a short shutter speed captures without blur, longer shutter speeds act as a sort of average of all of the light that hits the camera, so it may introduce blur.
things to think about:
- subject movement
- camera stability - if you’re not using a tripod, slower shutter speeds mean your handheld shot might be blurry. could be mitigated by camera stabilization but that is post processing by lens/camera
- how zoomed in are you/how cropped is the image - when magnifying, you also magnify blur, so you need a faster shutter speed
- how close are you to subject - smaller movements are magnified when close, if using faster shutter speeds
For handholding, you probably need 1/30 or 1/50th of a second speeds to avoid motion blur due to background impact of shaky hands.
ISO
to be reductive, is the sensistivity of the light sensor. higher values mean sensor does not need as much light, lower values means it needs to gather more light.
there are many ways to achieve what kind of exposure you want. If you reduce shutter speed, you may have to increase aperture or ISO. Or, if you increase ISO, you may have to decrease aperture or shutter speed (or some of both).
higher ISO leads to brighter images, so it can be useful in dark/night-time situations, but at high values can also lead to potential noise and grain (this can also be done on purpose, for creativity)
If camera is auto adjusting too much at night, can manually set ISO to 320 or something higher and see if that works better.
Stops
https://www.youtube.com/watch?v=vu5ohljtB-A
In this context, a stop is a relative meausrement of light that doubles/halves.
The f1.4 -> 2.0 -> 2.8 -> 5.6
are doubles, its just hard to tell because the amount of light is based on a circles area.
In the same way, 1/30 -> 1/60 -> 1/125 are doubles.
https://www.youtube.com/watch?v=D-GfbRkFtuw&list=PL2M0W9hN1Zzyy5yFv3vqNi1_5LAk0bo2h&index=3
strategy:
- set base ISO (usually 100) (this typically gives best performance for digital cameras)
- figure out what aperture you want for correct depth of field
- select shutter speed that gives you the exposure
- [maybe] use a faster shutter speed to eliminate motion blur
- [maybe] increase brightness by bumping ISO (at high levels can lead to grain) or having a larger aperture (can affect depth of field)
For 2+3, if you increase aperture by 3 stops, then you probably need to decrease shutter speed by 3 stops (so click the dials 3 times in the opposite ways), to maintain the same exposure as what the camera gave you.
Instead of base ISO/doing this all yourself, you could also instead start on auto everything and see what the camera gives you, and then either:
- bump aperture for more depth of field
- decrease shutter speed for less motion blur.
leaving ISO on auto so it exposes decently.
If you REALLY didn’t want grain but wanted to keep the same shutter speed to prevent blur, you could use a filter on top of your camera, like an ND filter which removes some of the light that enters the lens.
- ambient light - how bright the outside world is